
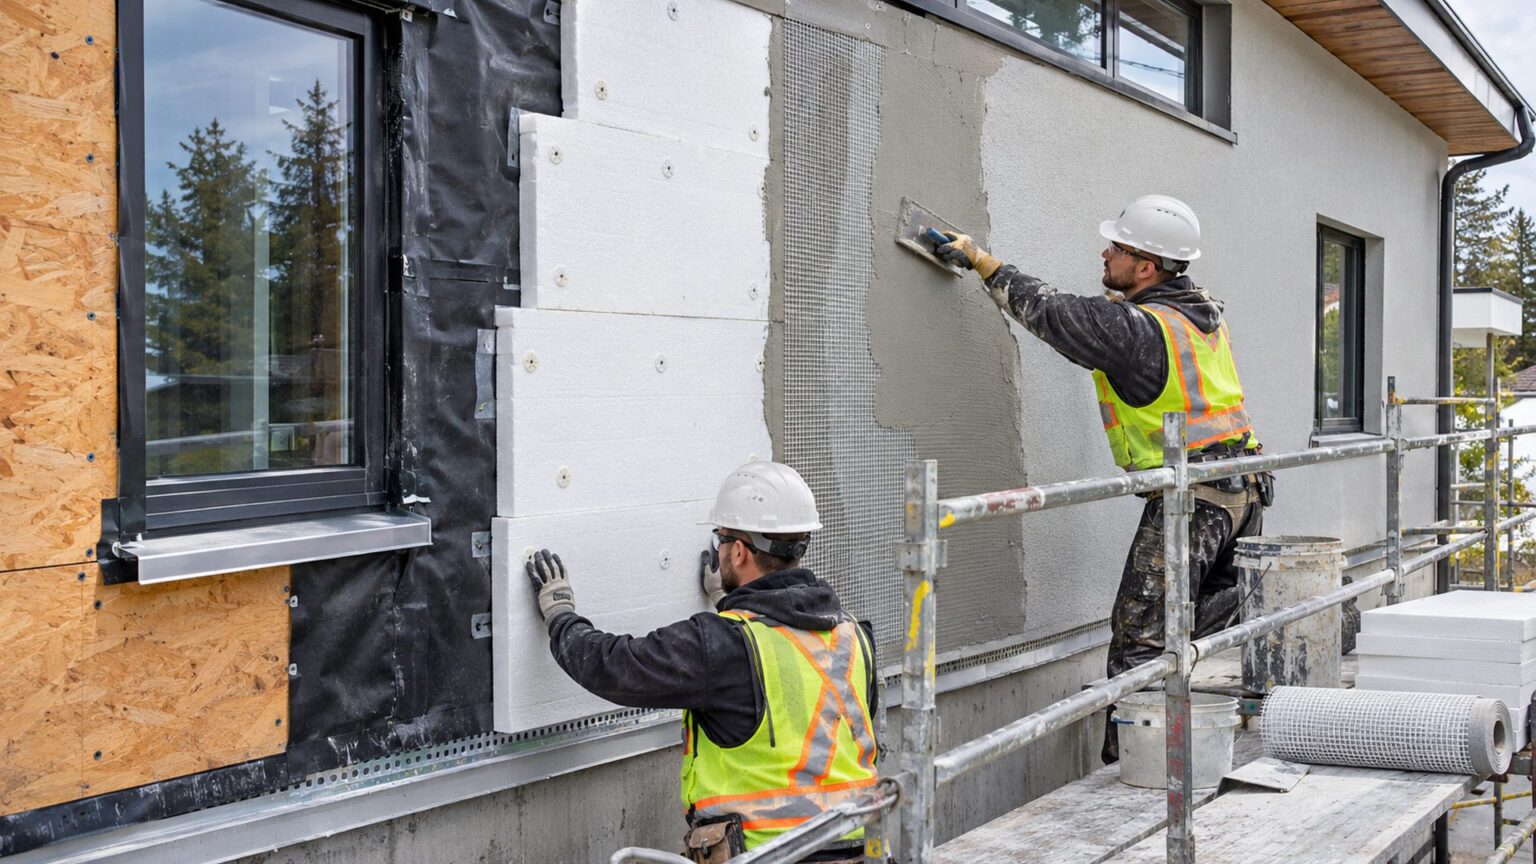
EIFs installation involves building a coordinated exterior wall assembly that combines insulation, reinforced coatings, and carefully designed moisture management. The finished surface may resemble stucco, but the layers beneath it work differently. Successful projects depend on sound substrates, compatible products, reliable drainage, accurate detailing around openings, and trained installers. This guide explains the complete process, the mistakes that cause trouble, and the questions property owners should ask before approving work.
Exterior Insulation and Finish Systems are used on houses and commercial buildings where continuous exterior insulation and design flexibility are priorities. Installation is not simply attaching foam panels and applying plaster. Each layer has a specific purpose, and problems at windows, roof edges, and penetrations can undermine an otherwise attractive wall.
What Is an Exterior Insulation and Finish System?
EIFS is a nonstructural exterior cladding system. A typical assembly includes insulation board attached to an approved substrate, a reinforced base coat, and a textured finish coat. A drainage design may also include a water resistive barrier and a path that allows incidental moisture to escape. Exact components vary by approved system.
The insulation reduces heat transfer across portions of the wall that would otherwise be affected by framing. The reinforced coating protects the insulation and supports the decorative finish. Neither layer replaces the building structure, and the finish should not be treated as a substitute for properly detailed water management.
EIFS Compared With Traditional Stucco
Traditional cement stucco is generally a cement based plaster applied over an appropriate supporting assembly. EIFS uses insulation beneath a thinner reinforced coating. Both can produce similar colours and textures, but their attachment methods, movement details, and moisture control arrangements differ.
A contractor experienced only with stucco may not automatically have the training needed for a particular EIFS system. Ask about experience with the specified products, including flashing transitions and drainage details.
Why Drainage Matters
Rain can enter exterior walls through construction gaps, failed sealant joints, or openings. A drainage type EIFS assembly is designed to manage incidental water behind the exterior finish and direct it outward. The drainage plane and exit points must remain connected rather than being blocked by adhesive or finish materials.
The 12 Essential Steps in EIFs Installation
The following sequence describes a common drainage type assembly. It is an overview for planning and quality checks, not a substitute for approved drawings, manufacturer instructions, or a qualified installer. Some steps occur together, and details differ for masonry, wood framing, steel framing, and existing buildings.
1. Review Design Documents and Local Requirements
Before ordering materials, confirm the specified EIFS system, intended insulation thickness, substrate type, wind loads, and applicable fire and energy requirements. The designer should resolve how the cladding meets windows, doors, roofs, foundations, balconies, and other wall materials.
Building codes and product approvals differ by location and building type. Some projects need particular fire tested wall assemblies or inspection procedures. Do not substitute insulation or finish products without confirming that the complete assembly remains acceptable.
Identify Critical Transitions
Mark locations where water, movement, and other systems intersect. These include window sills, penetrations, wall terminations, and attachments for lights or signs. Documenting these details early helps prevent improvised site decisions.
2. Inspect the Wall Substrate
The substrate must be sound, appropriately dry, clean, and suitable for the intended attachment. Check sheathing fasteners, joints, flatness, existing damage, and evidence of water intrusion. Repair damaged framing or sheathing before covering it.
A damp or deteriorated wall should never be concealed behind new insulation. Where an existing facade is being renovated, determine whether old coatings or materials need removal and whether hidden deterioration requires further investigation.
3. Install and Coordinate Flashing
Flashing manages water at openings and changes in wall geometry. Pay particular attention to window sills, heads, door thresholds, roof connections, and horizontal projections. Details should direct water toward the outside, not into the wall cavity.
The sequence matters. A flashing installed after surrounding layers are complete may not connect properly with the water control system. Confirm sill pan arrangements, termination points, and compatible materials before proceeding.
4. Apply the Water Resistive Barrier
Where the selected assembly calls for a water resistive barrier, apply the approved material over the prepared substrate. Liquid applied products commonly require particular surface preparation, reinforcement at joints, and curing conditions. Sheet materials use their own overlap and sealing procedures.
The barrier should remain continuous through corners and around openings. Follow the system requirements for thickness, coverage, drying, and compatibility. Pinholes, untreated seams, or poorly sealed penetrations can interrupt water control.
5. Provide a Continuous Drainage Path
Drainage assemblies need a reliable route for water to move downward and exit safely. Depending on the approved design, the path may be formed by vertical adhesive ribbons, grooved insulation, drainage mats, or another recognised method.
Install the specified drainage accessories and openings. Avoid placing adhesive or sealant in ways that block drainage. Inspect how the path connects to flashings at lower terminations and window heads, since a drainage gap without a suitable outlet cannot perform as intended.
6. Select and Prepare the Insulation Boards
Expanded polystyrene is commonly used in EIFS, while some approved assemblies employ different insulation materials. Board type, dimensions, thickness, and required surface conditions must match the specified system.
Store boards in a clean, protected location and check them before installation. Discard damaged or unsuitable pieces. Insulation thickness should follow the designed thermal requirements and the permitted assembly rather than being selected solely to create a desired appearance.
7. Attach Boards Using the Approved Method
Apply the specified adhesive or mechanical attachment arrangement for the substrate and system. On certain drainage assemblies, adhesive placement also helps form the drainage channels. Coverage patterns are therefore functional, not simply a matter of preference.
Fit boards closely and keep joints aligned with the manufacturer’s layout requirements. Stagger joints where specified and avoid unnecessary gaps. Confirm that boards remain properly supported while adhesives cure. Never rely on an improvised fastening pattern when wind resistance is a design consideration.
8. Shape Surfaces and Reinforce Vulnerable Details
After the boards are attached and ready for finishing, installers may rasp or shape the surface as approved to improve flatness. Uneven insulation can become visible under strong sideways light, even after the finish coat is applied.
Corners, openings, and changes in plane often need additional reinforcement. Follow the system’s requirements for diagonal reinforcement at opening corners and protection at exposed edges. Decorative shapes should not interfere with drainage or flashing.
9. Embed Reinforcing Mesh Correctly
Fiberglass reinforcing mesh strengthens the protective coating and helps manage cracking. The mesh is embedded in the specified base coat and must be positioned and overlapped as required by the system instructions.
High traffic areas may need additional impact resistance. This can involve a heavier mesh or another approved reinforcement arrangement. More mesh is not automatically better if layers are placed or embedded incorrectly. Check corners and transitions carefully before the next stage covers them.
10. Apply the Base Coat at the Required Thickness
The base coat forms the reinforced protective layer over the insulation. Mix and apply it using the specified materials, working time, and tools. The mesh should be properly embedded rather than left exposed or placed directly against the insulation without adequate coating.
Thickness and cure conditions matter. Applying too little material can compromise protection, while uneven or excessive application can affect appearance and system performance. Inspect coverage before allowing work to continue.
11. Apply Primer and Decorative Finish
Some EIFS finishes require a compatible primer; others follow different preparation procedures. Once the base coat is ready, apply the approved finish in the specified weather conditions. Texture and colour consistency depend on material batches, application technique, and coordinated work across the wall.
Plan natural stopping points rather than leaving visible irregular seams in prominent areas. Protect fresh finishes from rain, freezing conditions, excessive heat, and premature contact in accordance with product instructions.
12. Complete Sealants, Inspections, and Handover
Sealant joints at windows, doors, penetrations, and adjoining materials must match the designed joint dimensions and specified products. Sealants accommodate movement at intentional joints; they should not replace missing flashing or drainage details.
Before handover, review finished surfaces, terminations, drainage outlets, and visible joints. Record any corrections and obtain relevant product documents, maintenance instructions, and warranties. Photographs of concealed layers can be valuable evidence of completed work.
Weather and Site Conditions That Affect Installation
EIFS coatings and barriers may have minimum and maximum application conditions. Low temperatures can delay or prevent proper curing, while heat, direct sunlight, and wind can cause premature drying. Rain may damage uncured materials or interfere with adhesion.
Plan protective coverings and work sequencing around the actual forecast. The manufacturer’s temperature and moisture limits govern the selected product; a universal curing time cannot be applied to every system. Work should stop when specified conditions cannot be maintained.
Cold Weather Work
Provide suitable enclosure or heating only where permitted and practical. Protect uncured coatings from freezing and follow ventilation and fire safety requirements for any temporary equipment. Do not assume that a surface is warm enough because the afternoon air feels mild.
Hot Weather Work
Shade and staged application may help maintain consistent working conditions. Contractors should coordinate crew size and material preparation to avoid visible finish changes as surfaces dry. Follow the approved procedure instead of adding unapproved water to extend working time.
Common EIFS Installation Mistakes to Avoid
The most serious errors often occur at transitions rather than across broad, uninterrupted wall areas. Missing sill flashing, blocked drainage outlets, incomplete water barriers, and incompatible sealants can lead to moisture problems that are expensive to locate after the facade is finished.
Other mistakes include fastening boards to unsound substrates, omitting specified mesh reinforcement, applying coatings outside acceptable weather conditions, and combining products from different systems without approval. Cosmetic cracking or staining should prompt investigation of the underlying cause rather than immediate covering with another finish layer.
Drainage Systems Are Not Face Sealed Systems
Older face sealed approaches rely heavily on the exterior surface remaining an effective barrier. Drainage type assemblies add a designed route for incidental moisture. When assessing a proposal, confirm which system is actually being installed. The terms should not be treated as interchangeable.
How Much Does EIFS Installation Cost?
Pricing depends on wall area, insulation thickness, substrate condition, system specification, labour, access equipment, location, and architectural complexity. A straightforward wall may cost less to install than a facade with numerous windows, curved features, balconies, and difficult access.
Ask contractors to separate preparation, barrier work, insulation, reinforcement, finish, flashing, sealants, and scaffolding in their estimates. Include permits, inspections, waste handling, and repairs to concealed damage where relevant. A low initial price may omit work essential to long term performance.
Comparing EIFS With Other Exterior Finishes
An EIFS quote should be evaluated against the intended performance and complete project scope, not simply against the visible finish of brick, siding, or stucco. Exterior continuous insulation may provide thermal benefits, but actual energy savings depend on the whole building, climate, air leakage, and existing insulation. Avoid promises of a fixed reduction in utility bills.
How to Choose a Qualified EIFS Contractor
Look for documented experience with the selected system and comparable building types. Ask who prepares shop details, who checks substrates and barriers, and how concealed work is inspected before insulation or finish coats cover it.
Request an itemised quote, proof of appropriate insurance, applicable credentials, and written warranty terms. Ask to see completed projects with similar window details and exposure conditions. References are most helpful when they speak about follow through, maintenance issues, and communication as well as appearance.
Questions Worth Asking Before Signing
Ask whether all materials come from a compatible approved system, how drainage exits will be protected, and which inspection points will be documented. Confirm the plan for unexpected wet sheathing, changes in weather, and work that does not meet the drawings.
Discuss responsibilities for sealants and flashings where multiple trades meet. Ambiguity at those boundaries can create gaps in accountability and workmanship.
Considerations for Residential and Commercial Buildings
The same EIFS finish can appear on different types of buildings, but design requirements are not identical. A detached house may have different wall assemblies, window conditions, and approval requirements from a multi story commercial building. The contractor should not assume that details from one project can be copied to another without review.
Fire Performance Is an Assembly Question
Some insulation materials are combustible. On certain building types, fire performance depends on a tested wall assembly that includes specific insulation, barriers, sheathing, attachments, and other components. Height, occupancy, location, and construction type may also affect what is permitted.
A product advertised as fire resistant does not establish that an improvised complete wall is compliant. Confirm the specified assembly and obtain design approval before changing products or thicknesses. Fire stopping and details at floor lines and openings may also need particular treatment.
Retrofit Walls Need Extra Investigation
Older buildings may conceal water damage, irregular framing, or multiple existing layers. A new exterior finish should not trap an unresolved leak behind insulation. Determine how the retrofit affects window depth, roof projections, foundations, and existing ventilation openings. Where needed, arrange exploratory inspections before work begins.
How to Inspect EIFs Installation Quality Before Final Payment
Visual appeal matters, but a smooth finished surface does not prove the hidden layers were completed correctly. Owners can request planned inspection points and photographs before barriers, insulation, and coatings conceal earlier work. A construction professional can compare these records with approved details.
Inspect the Details That Cannot Be Seen Later
Confirm that substrate repairs were finished, opening flashings were coordinated, and drainage outlets remain clear. Check that the chosen insulation and attachment methods match the specified assembly. Record required reinforcement at corners, openings, and high impact locations before the finish covers it.
Assess the Visible Finish Without Ignoring Function
Look for inconsistent textures, visible board joints, surface cracking, or poorly formed transitions. Some visual variation can occur with lighting and finish technique, so assess apparent defects under suitable conditions and against the agreed standard. Test accessible window and door operation to ensure added wall thickness has not obstructed them.
Agree on a Written Correction List
Before the last payment, record unresolved items, the person responsible, and the completion method. Obtain warranties, maintenance advice, and system identification documents. This makes future repairs easier because technicians can identify compatible materials rather than guessing which coating or sealant was installed.
Maintenance After the Exterior Is Finished
Inspect the facade periodically and after major storms. Watch for damaged sealant joints, impact marks, cracking, staining, and blocked drainage outlets. Keep irrigation spray and excessive water exposure away from vulnerable details where practical.
Clean surfaces using methods recommended for the finish. Pressure washing at unsuitable settings can damage coatings or force water into joints. Repair local damage promptly using compatible materials, and have persistent moisture symptoms assessed before applying a cosmetic patch.
Frequently Asked Questions
1. What is EIFs installation?
EIFs installation is the process of assembling exterior insulation, reinforced coatings, and a decorative finish over a suitable wall substrate, with moisture management details required by the selected system.
2. Is EIFS the same as traditional stucco?
No. EIFS includes an insulation layer beneath reinforced coatings, while traditional cement stucco uses a different plaster assembly and attachment method.
3. Does EIFS need a drainage system?
Many modern assemblies include drainage, and project requirements vary by code, substrate, and approved design. The specified water control approach must be followed exactly.
4. Can EIFS be installed over existing siding?
Not automatically. The existing wall must be assessed for compatibility, soundness, moisture damage, and attachment requirements before an approved system can be selected.
5. How long does EIFS installation take?
Timing depends on building size, complexity, crew capacity, weather, and required curing intervals. A contractor should provide a schedule based on the particular system and project.
6. How can owners prevent moisture problems in EIFS?
Prioritise correct flashing, continuous water control, open drainage routes, compatible sealants, and periodic inspection. Address leaks and damaged joints promptly.
Conclusion
A successful EIFS project starts with a suitable design and a dry, sound substrate, not with the decorative finish. Careful flashing, continuous drainage, compatible materials, and correct mesh and coating application are essential to dependable performance. Property owners should choose experienced installers and inspect concealed details before they are covered. With thoughtful maintenance, the completed exterior can provide an attractive finish and useful continuous insulation without relying on unsupported performance promises.
