
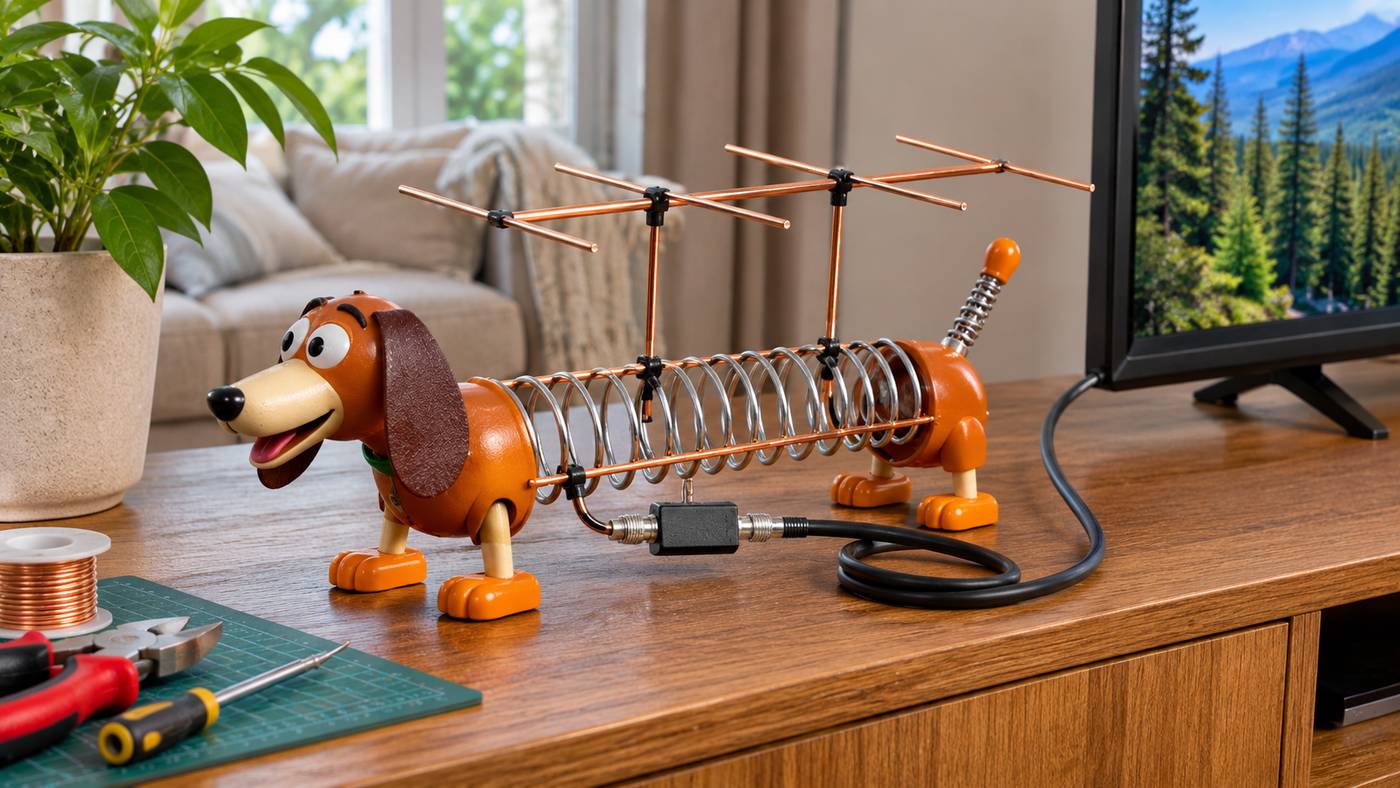
A familiar spring-bodied toy dog may seem like an unlikely piece of television equipment. Yet a 2026 do-it-yourself project has shown how a novelty toy can become the framework for an experimental indoor receiving antenna. The slinky dog antenna combines an adjustable metal spring, carefully positioned conductive elements, and an ordinary television connection to explore the science of over-the-air broadcasting. It is an appealing project for hobbyists, families interested in electronics, and viewers curious about receiving local TV without a cable subscription.
The idea deserves a practical explanation rather than an exaggerated performance promise. A homemade antenna may receive local stations, but the result depends on the broadcast frequencies, signal strength, building materials, antenna geometry, and where the device is positioned. What works in one living room might perform poorly in another. The slinky dog antenna project is most useful when treated as an experiment that can be measured and improved.
This guide explains what the project actually is, how the components interact, what the original maker claims, and 11 practical tips for safe assembly and realistic reception testing. It also distinguishes a toy-dog TV antenna from older spring-based amateur-radio antennas and explains why digital television standards still matter.
What Is a Slinky Dog Antenna?
A slinky dog antenna is a homemade over-the-air (OTA) television receiving antenna built around a classic pull toy with a metal-coil body. The toy supplies a distinctive adjustable framework; additional conductive elements and a suitable television feed connection allow the assembly to act as an experimental antenna.
In August 2026, OOHUB, LLC publicized a Slinky Dog television antenna project, accompanied by a video and an online DIY guide. Its suggested parts include a retro-style Slinky Dog toy, 12-gauge THHN-insulated solid copper wire, and a 300-to-75-ohm matching transformer. The maker describes the arrangement as an adjustable reflector-style antenna and encourages experimenting with its position and shape.
The project’s strong reception claims are based on the maker’s own demonstration, not an independent comparative laboratory test. Its published guide itself notes that receiving all available local stations in one test location does not mean every household will obtain the same results.
Is It a Commercial TV Antenna?
The project is primarily presented as a DIY conversion of an existing toy, rather than a standardized, independently rated mass-market antenna. A builder supplies the toy and electrical components, completes the assembly, and tests reception. Do not confuse the online parts estimate with a confirmed retail price for a finished product.
What Makes the Toy Relevant?
For a slinky dog antenna, the coiled body can be extended, contracted, tilted, and arranged in different ways. Its metallic structure may interact with incoming radio-frequency energy, while the added copper elements provide an intended receiving structure. The toy’s adjustable form makes antenna positioning visible and engaging, although its exact performance depends on the completed geometry.
How Does the Slinky Dog TV Antenna Work?
Over-the-air television stations transmit radio-frequency signals from broadcast facilities. A receiving antenna interacts with the incoming electromagnetic field and develops a small electrical signal that a compatible television tuner can process.
Antenna geometry matters. The length and arrangement of conductive elements, their orientation to the incoming signal, nearby metal objects, and the feed connection can change reception. In a homemade design, seemingly minor physical adjustments can produce noticeable results, especially indoors where reflections and obstructions are common.
The Role of the Metal Spring
A metal spring is a conductor arranged into a helix. Hobbyists have experimented with spring-based antennas for decades. However, that history does not prove that every Slinky configuration works equally well at television frequencies.
In the OOHUB toy-dog project, the spring body is discussed as part of an articulating reflector-style arrangement. It should not be assumed that the original toy spring alone provides all the useful reception or that more stretched metal automatically means stronger TV signals.
Why Copper Elements Are Used
The published DIY guide specifies insulated solid copper wire. Copper is electrically conductive, and wire elements can be shaped to form an antenna structure suitable for experimentation. The correct dimensions and arrangement matter more than simply using a thicker conductor.
What Does the Matching Transformer Do?
The slinky dog antenna materials list includes a 300-to-75-ohm matching transformer, sometimes called a balun in consumer antenna projects. It is commonly used to connect certain balanced antenna feed arrangements to the 75-ohm coaxial input found on televisions. Its usefulness depends on the antenna design and connection method; it does not independently amplify a weak signal.
Does It Need Internet Access?
Ordinary OTA television reception does not require broadband internet or a streaming subscription. The antenna receives locally available broadcast signals, and the television or external receiver decodes them. Interactive or connected services associated with some newer broadcast systems may have separate internet requirements.
Parts and Equipment to Consider
The original Slinky Dog project names a few core materials. Additional tools or protective items may be needed depending on how the builder follows the maker’s instructions.
| Component | Intended function | What to verify |
|---|---|---|
| Metal-coil dog toy | Adjustable supporting structure | Condition, stability, and conductive spring |
| Insulated solid copper wire | Form receiving elements | Correct type, dimensions, and secure routing |
| 300-to-75-ohm matching transformer | Connect a compatible balanced feed to coax | Correct terminals and TV-side connection |
| Coaxial cable | Carry the received signal to a tuner | Suitable connector and undamaged cable |
| Cable clips or supports | Keep conductors positioned | No sharp edges or exposed loose ends |
| Digital television or external tuner | Decode local broadcasts | OTA tuner compatibility and antenna input |
Important: This is an overview of the original project’s components, not a universal electrical schematic. Follow a verified design and keep the project strictly as a low-power receiving experiment. Never connect the toy or its conductors to a wall electrical outlet.
11 Brilliant Tips for Building and Testing a Slinky Dog Antenna
1. Check Local Broadcast Availability Before Buying Parts
Start by learning which TV stations might be received at the location where the antenna will be used. AntennaWeb offers an address-based tool that helps identify local stations, transmitter directions, and relevant broadcast frequencies.
Reception predictions are only estimates. They depend on terrain, nearby structures, and antenna height. A location that already struggles with a properly installed conventional antenna may not be a promising place for a novelty indoor project.
Researching local coverage first gives the slinky dog antenna experiment a meaningful baseline rather than an unrealistic channel-count target.
2. Understand That This Is a TV Receiving Project
The spring-bodied design should not be confused with a Wi-Fi range extender, cellular booster, or guaranteed high-frequency amateur-radio transmitting antenna. The OOHUB demonstration concerns receiving local broadcast television.
Historical Slinky-coil antennas have been used in amateur radio, but those designs operate under different assumptions, frequencies, feed systems, and safety requirements. Do not attach this toy project to a transmitting radio without a properly engineered design and appropriate expertise.
3. Follow the Intended Copper-Element Design
The original project specifically recommends insulated solid copper wire. Its conductor placement forms part of the experimental antenna configuration.
Replacing it casually with unrelated wire, connecting only the toy’s spring, or changing conductor dimensions can alter the electrical behavior. If you want to test modifications, change one parameter at a time and record the outcome. That approach produces more useful learning than making multiple unmeasured changes together.
4. Use an Appropriate TV Feed Connection
A conventional television antenna input is normally designed for a 75-ohm coaxial connection. The project recommends a 300-to-75-ohm matching transformer for its chosen feed arrangement.
Make sure the cable and transformer are suitable for the design and securely connected. Loose contacts, damaged coax, or accidental shorts can impair the result. Avoid makeshift connections to unrelated television ports, household power wiring, or external transmitters.
5. Make the Assembly Mechanically Stable
A toy with an extendable metal body may move or collapse unexpectedly if its spring is stretched too far. Support the components so that the conductor geometry remains consistent during testing.
Protect any cut wire ends and keep small parts away from children. Position the completed slinky dog antenna on a stable surface where it cannot fall onto people or damage the television. A careful mounting arrangement is useful for both safety and repeatable signal measurements.
6. Work Only With Equipment Safely Disconnected
Disconnect the television from power before handling its antenna connector if required by the manufacturer’s instructions. Do not open the television, connect to household wiring, or attempt to power the toy antenna from a wall socket.
For this simple indoor receiving project, there should be no need to modify mains-powered components. If the chosen construction method involves soldering, cutting conductors, or other tools, follow the tool manufacturer’s safety guidance and obtain competent adult supervision where appropriate.
7. Try a Higher Indoor Position
The location of an antenna can matter as much as the antenna itself. The FCC has advised that indoor reception may improve when an antenna is placed higher, near a window, or away from electronic equipment.
A toy displayed directly on top of a television may be visually appealing, but it is not necessarily the best signal location. Try a safe shelf, stable window-adjacent stand, or another suitable position where the antenna cannot fall. Avoid running cables across walkways.
8. Experiment With Direction and Orientation
The Slinky Dog form allows changes in how the spring and added conductors face the incoming signal. Rotate the assembly gradually and adjust its pose while observing the television’s signal-quality information, if available.
Keep a record of the position for each test. A channel improving after adjustment is a useful observation, but the improvement may be due to signal reflections rather than a simple direct line toward the transmitter.
9. Perform a Complete Over-the-Air Channel Scan
After connecting the antenna, set the television to its antenna or air input rather than cable mode. Use the television’s channel-search function according to its manual.
A tuner must search for digital broadcasts; an antenna does not create channels automatically. Re-scan after major positioning changes if necessary, although some televisions allow you to inspect signal quality without repeating the entire scan.
Keep track of which stations are reliable, not just how many channel names appear in the list.
10. Compare Results With an Ordinary Indoor Antenna
To evaluate whether the slinky dog antenna actually performs well, use a comparison antenna on the same TV in the same room. Keep the test conditions as similar as practical.
Record channel availability, picture dropouts, signal-quality readings, and the effect of placement. A novelty design that receives several stable local stations may be successful as an educational experiment even if a conventional model performs better overall.
11. Set Realistic Expectations About Reception
The maker’s article reports encouraging local results and suggests that careful positioning can help with pixelated channels. Those are project-specific observations, not guarantees for every household.
AntennaWeb emphasizes that distance, transmitter location, terrain, building materials, frequency, and antenna placement all affect reception. The most useful outcome is a design that works reliably for your own stations—not a claimed universal range or an unsupported promise of receiving every channel.
How to Approach the DIY Build Step by Step
A safe, repeatable slinky dog antenna project should begin with a documented construction plan. The following sequence describes the workflow at a high level rather than replacing the original maker’s wiring and placement instructions.
Step 1: Inspect the Toy and Materials
Confirm that the spring body is intact and that the toy can rest securely in the intended position. Examine the cable, matching transformer, and insulated wire for damage. Replace defective parts rather than improvising a repair.
Step 2: Review the Original Layout
Use the project’s published video or guide to understand where the receiving elements and feed connection belong. Determine the intended conductor routing before cutting or fastening anything. The specific geometry matters to performance.
Step 3: Prepare the Receiving Elements
Measure and arrange the copper components according to the documented design. Use suitable tools and protect against sharp metal ends. Do not assume a random length of wire will perform as well as a deliberate element arrangement.
Step 4: Secure the Matching Connection
Follow the design’s connection instructions for its balanced antenna element and matching transformer. Keep conductors from touching where they should remain separate. The objective is a stable RF connection, not a connection to any electrical power source.
Step 5: Route the Coaxial Cable
Connect the appropriate coaxial feed to the antenna input of a compatible TV or external receiver. Avoid crushing the cable beneath furniture or sharply bending it around the toy.
Step 6: Place the Toy and Scan
Put the assembly on a stable indoor surface, select antenna mode on the television, and perform a channel scan. Note the initial results before changing the toy’s position.
Step 7: Refine the Position
Adjust height, orientation, and conductor position only within the bounds of the documented design. After each change, check the same stations and record whether reception becomes more or less reliable.
How to Test Reception Without Exaggerating Results
A useful slinky dog antenna experiment measures reception consistently. Merely discovering a station in a scan does not demonstrate that the channel remains watchable.
| Test | What to record | Why it matters |
|---|---|---|
| Initial scan | Number and names of detected local services | Establishes a baseline |
| Ten-minute viewing check | Freezes, missing sound, or picture dropouts | Measures practical reliability |
| Placement change | Position, height, and direction | Identifies location-dependent behavior |
| Comparable antenna test | Same channels with another antenna | Adds a performance reference |
| Different time of day | Changes in reception quality | Reveals environmental variation |
If the television displays signal strength and signal quality separately, prioritize whether the digital signal can be decoded reliably. A large strength reading with unstable quality is not the same as clear, dependable reception.
Why Indoor Reception Can Be Unpredictable
Building materials, metal screens, wiring, nearby electronics, and reflected signals all influence performance. Moving an antenna a short distance may improve one station while reducing another. That is normal for many indoor reception environments.
Can a Slinky Dog Antenna Receive HDTV and NextGen TV?
The slinky dog antenna receives radio-frequency energy; it does not decode the television broadcast format. The television or receiver performs the digital decoding.
Standard Digital HDTV
In the United States, ordinary digital television reception typically uses a compatible ATSC 1.0 tuner. If local stations use frequencies that the homemade antenna receives adequately, a suitable receiver may display their programming.
There is no special physical property that makes an antenna an HDTV antenna. What matters is reception of the relevant RF channels and compatibility of the tuner.
ATSC 3.0 or NextGen TV
ATSC 3.0 is a different broadcast standard. The Advanced Television Systems Committee’s updated 2026 standard describes it as largely incompatible with earlier ATSC systems.
The same physical antenna may be able to collect signals used by an ATSC 3.0 broadcast, but decoding requires an ATSC 3.0-compatible receiver or suitable external equipment. Building a slinky dog antenna does not upgrade an older ATSC 1.0-only tuner.
VHF and UHF Matter
Local stations operate on different radio-frequency channels, including VHF and UHF. An antenna design can perform differently across those frequencies. Before concluding that a station is unavailable, investigate whether the receiving element is suitable for its actual RF channel.
How Much Does a DIY Slinky Dog TV Antenna Cost?
The OOHUB slinky dog antenna project suggests that a homemade version can cost around $50 in parts. That is the creator’s estimate, not a verified current market price or a guarantee that every builder can obtain the components for that amount.
The total depends on whether you already own the toy, the cost of wire and connectors, available tools, and any additional cable or support hardware. Shipping can also change the total.
A standard indoor TV antenna may cost less than a complicated toy conversion, particularly when time and tools are considered. The strongest reasons to build this project are curiosity, nostalgia, and learning rather than guaranteed savings.
Cost Comparison: DIY vs Commercial Antenna
| Consideration | Toy-dog DIY project | Conventional indoor antenna |
|---|---|---|
| Primary benefit | Educational and decorative experimentation | Straightforward reception |
| Assembly | Requires parts and careful building | Usually ready to connect |
| Performance claims | Maker demonstration, limited independent verification | Depends on model and local conditions |
| Adjustment | Toy geometry and location can be changed | Placement or direction can be adjusted |
| Technical support | Primarily instructions and hobbyist experimentation | Depends on manufacturer and retailer |
| Best user | DIY enthusiast or electronics learner | Viewer prioritizing convenience |
Slinky Dog Antenna vs Traditional Slinky Radio Antennas
Spring-based antennas existed long before the 2026 toy-dog experiment. Amateur-radio hobbyists have used Slinky coils in compact antennas, including dipole and portable receiving arrangements. Historical advertisements and amateur-radio discussions document those older designs.
However, an HF amateur-radio antenna and an indoor TV receiving antenna do not necessarily share the same electrical design. Frequency, resonance, matching, polarization, and transmission power requirements can differ dramatically.
The dog-shaped project is primarily described as a novelty OTA television receiver accessory. It should not be marketed as a proven ham-radio transmitter, broad-frequency scanner antenna, or guaranteed long-distance television antenna merely because the toy includes a metal spring.
Safety Guidelines for an Indoor Antenna Experiment
A slinky dog antenna should remain a low-risk receiving experiment when assembled and used appropriately. Still, ordinary workshop and household precautions matter.
Keep It Away From Household Electrical Wiring
Never connect the antenna to a wall outlet, light fitting, power cable, or other mains electrical circuit. The intended television antenna input is not an electrical supply connection.
Protect Against Sharp Conductors
Cut copper wire can leave sharp ends. Secure them properly, prevent strain on connections, and avoid leaving exposed components where children or pets can reach them.
Keep the Assembly Stable
A spring-bodied toy can shift unexpectedly. Use a stable display surface and secure cables so they do not pull the toy down or create tripping hazards.
Avoid Outdoor or Rooftop Improvisation
The original design is presented as an indoor project. Do not place it outside near power lines or convert it into a rooftop installation without appropriate engineering, grounding, weatherproofing, and professional safety consideration.
Keep Expectations Age-Appropriate
The novelty can be useful for supervised science education, but it should not be treated as an unsupervised children’s craft involving wire cutters, sharp metal, or tools.
Common Slinky Dog Antenna Problems and Solutions
No Channels Found
Verify that the television has a compatible broadcast tuner, the input is set to antenna rather than cable, the matching connection is secure, and a full channel scan was performed. Check local station availability before changing the design.
Some Stations Are Pixelated
A marginal digital signal can cause freezing, blocks, or dropped audio. Try an appropriate higher placement, a different direction, or another location near a window. Compare results with a conventional antenna before blaming the television.
VHF Channels Are Missing
The antenna may not perform well at the relevant VHF frequencies. Confirm the station’s actual RF channel and consider whether a conventional antenna with appropriate VHF elements would be more suitable.
Reception Changes When the Toy Moves
The conductive geometry and surrounding environment change when the toy is stretched or rotated. Record the best configuration and support it so it remains consistent.
An Amplifier Does Not Improve Reception
Amplifiers cannot recover a signal that the antenna fails to collect adequately, and they can introduce problems when strong signals or interference are present. Try placement, connections, and a suitable antenna design before purchasing amplification equipment.
Why This Project Can Be a Useful STEM Activity
The slinky dog antenna turns an abstract radio-frequency concept into a hands-on experiment. Participants can observe how an antenna’s shape, location, and orientation influence reception without transmitting radio signals.
It also creates opportunities to discuss the difference between a conductor and a receiver, the purpose of a matching transformer, and why channel scanning is required.
A simple experiment might compare the number of stable channels received at three safe indoor positions. Students can record their observations and discuss which factors may explain the differences. This encourages evidence-based thinking rather than assuming a clever design works everywhere.
The goal should be learning and a reproducible result, not claiming that a toy outperforms all engineered antenna products.
Frequently Asked Questions
1. Does a slinky dog antenna really work?
A 2026 DIY project reports successful reception of local over-the-air TV stations using a modified Slinky Dog toy. Results have not been established as universal through independent comparative testing, and actual performance depends heavily on location and setup.
2. What materials are needed to make a slinky dog antenna?
The published OOHUB project identifies a retro spring-bodied dog toy, 12-gauge insulated solid copper wire, and a 300-to-75-ohm matching transformer. A suitable coaxial lead, tools, and secure mounting may also be needed.
3. Can the antenna receive free HDTV without internet?
It may receive free local OTA broadcasts when signals are available and the television has a compatible tuner. Internet access is not generally required for ordinary broadcast reception, and ATSC 3.0 programs require compatible decoding equipment.
4. Is a homemade Slinky Dog antenna better than a commercial TV antenna?
Not necessarily. Its main advantages are novelty, adjustability, and educational value. A conventional antenna may be easier to install and more dependable, particularly in weak-signal locations or where specific VHF channels are important.
Conclusion
The slinky dog antenna is a memorable example of turning an everyday toy into a practical radio-frequency experiment. Its 2026 DIY demonstration shows a creative approach to indoor television reception, but the maker’s successful results should not be mistaken for guaranteed performance everywhere. Careful assembly, appropriate TV connections, safe placement, and repeatable channel tests provide the best basis for evaluating the idea. For hobbyists who value learning and nostalgia as much as reception, the project offers an engaging way to explore how broadcast antennas work.
