

Losing important files from a hard drive can feel permanent, but in many cases, deletion is only the first step in the data loss process, not the last. The real outcome often depends on what you do next. A smart recovery workflow helps you reduce overwrite risk, avoid unnecessary damage, and choose the right method before the missing files become harder to recover.
This guide explains how to recover deleted files from a hard drive using a practical step-by-step workflow. It is written for everyday users, creators, students, office workers, and small business teams who need a safer and more organized way to deal with deleted documents, photos, videos, and project files.
If you need a recovery tool during the process, you can start with Recoverit, explore its Windows Data Recovery option for PC-based recovery tasks.
Why a Smart Recovery Workflow Matters
When files are deleted from a hard drive, they are not always erased immediately. In many cases, the file system simply marks that storage space as available for reuse. That means your files may still exist on the drive until new data overwrites them. This is why people sometimes recover deleted files successfully even after emptying the Recycle Bin or Trash.
However, recovery is never guaranteed. The outcome can depend on several factors:
- Whether the deleted files have already been overwritten
- Whether the hard drive is an HDD or SSD
- Whether TRIM has affected deleted SSD data
- Whether the drive has bad sectors or physical damage
- Whether the user kept saving new files to the same drive after deletion
A smart workflow does not promise a perfect result. Instead, it helps you make better decisions quickly and lowers the chance of turning a recoverable situation into a permanent loss.
Common Situations Where Files Are Deleted from a Hard Drive
- Accidentally deleting files from an internal hard drive
- Emptying the Recycle Bin or Trash too early
- Removing folders while cleaning up storage space
- Deleting files from an external hard drive connected to a laptop or desktop
- Losing project files after moving data between partitions or devices
- Deleting the wrong items during backup or sync management
The workflow below is especially useful for logical deletion cases. If your drive makes clicking noises, disappears from the system, or shows signs of hardware failure, software-based recovery may not be the safest first step.
What to Do Immediately After You Notice Files Are Missing
1. Stop using the affected drive
This is the most important first action. If you keep downloading files, exporting videos, installing apps, or moving data onto the same hard drive, you increase the chance of overwriting the deleted files.
2. Identify where the files were stored
- Were the files on the system drive or a secondary drive?
- Were they on an internal HDD, internal SSD, or external hard drive?
- Did you delete them normally, or did you format, repartition, or transfer files around the same time?
3. Check easy recovery options first
- Recycle Bin on Windows
- Trash on Mac
- File History, Time Machine, or cloud backups
- Shared folders or synced storage versions
A Smart Recovery Workflow: Step by Step
Step 1: Isolate the Drive and Avoid Overwriting It
The goal of this step is to preserve whatever recoverable data is still present.
If the deleted files were on an external hard drive, disconnect it safely until you are ready to recover. If they were on an internal secondary drive, avoid using it for downloads or large file writes. If they were on your system drive, keep activity as light as possible and avoid installing large new programs to that same partition.
This step sounds simple, but it is often where recovery chances are won or lost. Many users panic, install multiple tools, save recovered files back to the same drive, and reduce their results.
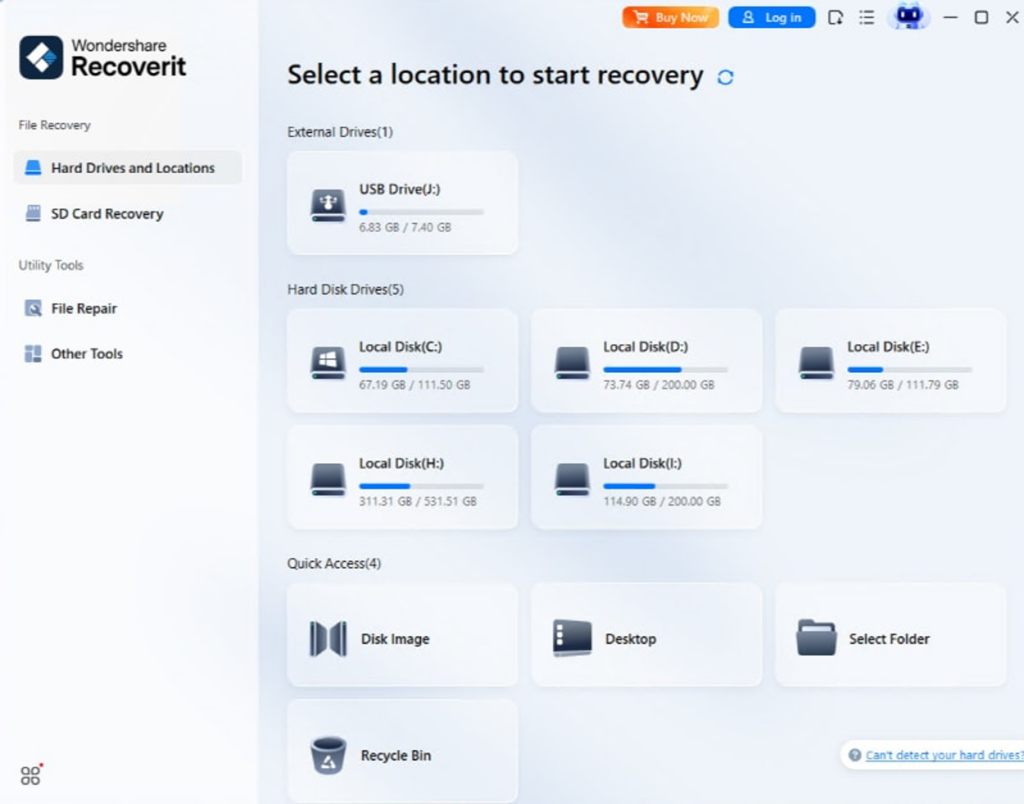
Practical Tip: If possible, use another healthy drive to save recovered files later. Never use the same affected drive as the destination during recovery.
Step 2: Check Built-In Recovery Paths Before Deep Scanning
A smart workflow always starts with the fastest and lowest-risk options.
On Windows, open Recycle Bin and search for the deleted file name, file type, or deletion date. If you find it, restore it immediately. You can also check File History or OneDrive version history if those features were enabled.
On Mac, open Trash and review recently deleted items. If you use Time Machine, look for an earlier version of the folder or file. iCloud Drive and some third-party sync tools may also store recoverable versions.
If these options fail, you have confirmed that software-based file recovery is the next logical step.
Why This Step Is Smart: Deep scanning takes more time and may return many recoverable fragments. Built-in recovery paths are faster, cleaner, and better for recently deleted files. They also reduce the need for broad scans when the solution is already available.
Step 3: Scan the Hard Drive with Recovery Software and Recover to a Safe Location
Once you are ready to use recovery software, connect the drive or open the affected partition and run a scan. The ideal tool should let you:
- Select the exact drive or partition where files were deleted
- Run a deep scan when a quick search is not enough
- Preview recoverable files before restoring
- Filter by file type, path, date, or size
- Save recovered files to another location
A practical option is to use recoverit if you want a guided workflow, especially when you need to scan common file types such as documents, photos, videos, and archives. Windows users comparing tools can also review the dedicated Windows Data Recovery, while users focused on deleted or missing drive content can read more about hard drive recovery.
- Launch the recovery software.
- Select the affected hard drive or partition.
- Start a scan.
- Preview results by file type or location.
- Recover the files you need.
- Save them to a different healthy drive.
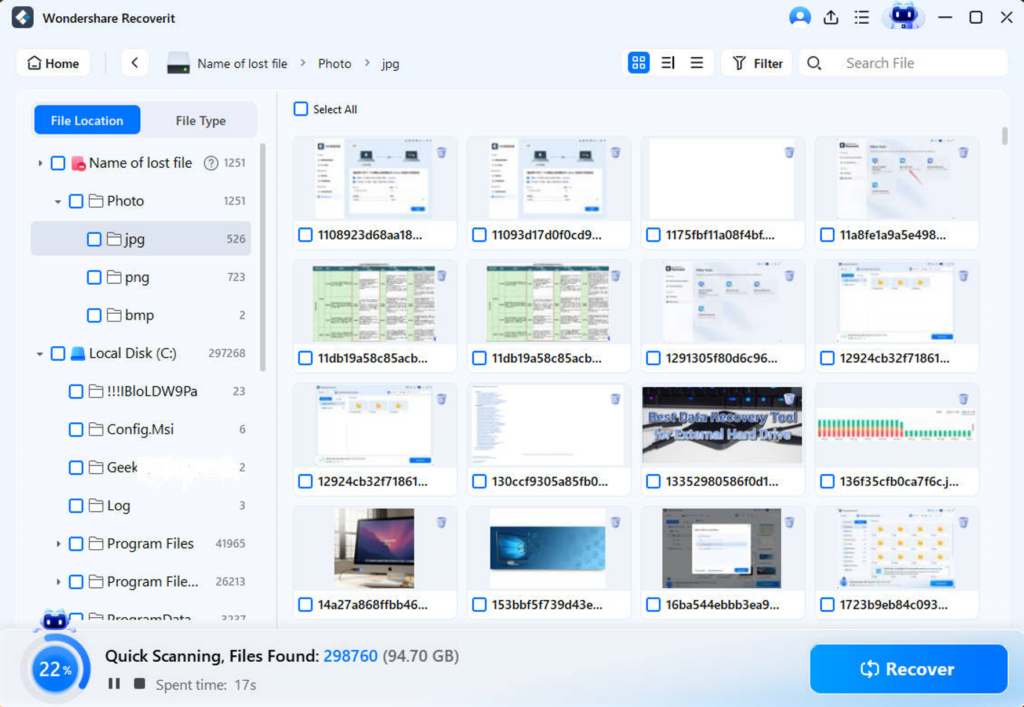

Smart Recovery Rule: Do not recover files back to the same hard drive if you can avoid it. Writing recovered data to the original drive may overwrite other lost files that have not been restored yet.
How This Workflow Applies to Windows and Mac Users
The core recovery logic is similar on both systems: stop writing new data, check built-in recovery options, then scan with recovery software if needed. The main difference is where deleted files first go and what native backup tools are available.
On Windows
- Deleted files may go to Recycle Bin first
- File History may help if it was enabled
- NTFS file structure may preserve recoverable entries for a period of time
- Internal secondary drives and external drives are common recovery targets
On Mac
- Deleted files may go to Trash first
- Time Machine can be a strong recovery path for backed-up folders
- APFS behavior varies by drive and activity after deletion
- External drive workflows are common for creators and media professionals
In both environments, the biggest user mistake is continuing normal usage after deletion.
What If the Files Were Deleted from an External Hard Drive?
The workflow is often even safer for external hard drives because you can disconnect the device quickly. That reduces background writes from the operating system, apps, and temporary file creation.
- Stop using the device immediately
- Do not copy new files to it
- Reconnect it only when ready to scan
- Recover the deleted files to your computer’s internal drive or another external drive
This scenario is especially common for photographers, video editors, designers, and business users who keep working files on portable drives.
What If the Deleted Files Were on an SSD?
This is where expectations need to stay realistic. SSD recovery may be more difficult because many SSDs use the TRIM command, which can clear deleted data more aggressively than traditional hard drives. That means deleted files on an SSD may become unrecoverable faster, depending on the device, system behavior, and time passed since deletion.
This does not mean SSD recovery is impossible in every case. It means you should act quickly and avoid assuming that recovery will work the same way it often does on an HDD.
Warning Signs That You Should Stop DIY Recovery
- The drive makes clicking, grinding, or repeated spin-up sounds
- The drive disappears randomly or is not recognized at all
- The drive asks to be initialized unexpectedly
- The partition table appears corrupted after a shock or power issue
- The data is high-value business, legal, or irreplaceable creative work
Software tools are designed mainly for logical data loss, not serious hardware failure. Continuing DIY attempts on a failing drive can sometimes make professional recovery harder.
Common Mistakes That Reduce Recovery Chances
- Continuing to use the affected drive normally
- Installing recovery software onto the same drive where files were deleted
- Saving recovered files back to the original drive
- Running too many tools one after another without a plan
- Ignoring signs of physical failure
- Expecting every deleted file to be fully recoverable
The smartest recovery workflow is usually the calmest one.
Final Thoughts
If you need to recover deleted files from a hard drive, the best approach is not to rush blindly. A smarter workflow starts with protection, moves through quick checks, and only then uses recovery software in a controlled way. That sequence helps reduce risk and improves your chances of finding recoverable data before it is overwritten.
For users who want a practical tool-based path, recoverit offers a guided recovery flow, while the Windows Data Recovery page can help PC users evaluate fit, and the broader hard drive recovery resource is useful for related drive-loss scenarios.
Recovery results can vary based on device type, overwrite activity, file system behavior, and hardware health. But if you act early and follow a structured workflow, you give yourself a better chance than panic-driven trial and error.
